Custom Dialogflow Chatbot using BotUI
EDIT (23/5/2018) : This tutorial was written at a time when dialogflow was called api.ai, due to which this article is outdated as well. I will try to write a new, better one soon! After-all, we are using custom chatbots at our New product TalkyJobs. Cheers.
Bots are popular for being accessible on Platforms like Twitter, Facebook, Slack and so on.. This is not a tutorial for those bots!

This Tutorial will teach you to run a custom UI chatbot which will be rely on Dialogflow for NLP.
You can skip all this and just clone my github repo, It has a shorter documentation(recommended for experienced developers).
Stuff We Will Use :
Dialogflow.com : It is a developer of human–computer interaction technologies based on natural language conversations(or NLP).
BotUI : A JavaScript framework to create conversational UIs.
NodeJS : A popular platform for developing backend Stuff.
Socket.IO : A JS Library for bi-directional communication between web clients and servers.
PreRequisites :
- You Should Have Node Installed.
- You Should Have NPM Installed.
- You should Have a Text Editor and an Internet Connection(duh..).
Lets Get Started!
First we will head to Dialogflow and get an API key!
- Go to www.dialogflow.com
- Sign Up with your Google Account.
- Create an Agent, Go to settings and copy the client access token in a safe place(we will need it later).

Lets Set Up the Project now!
Open CMD/Terminal and run the following.
$ npm install express -g
$ express--view=ejsmy_cool_bot view
$ cd my_cool_bot
$ npm install
We Just created a new project named my_cool_bot and installed some important dependencies.But we are not finished installing dependencies yet, lets install Socket.IO and Dialogflow modules now
npm install socket.io
npm install apiai
Head over to package.json and it should look something like this :
Now lets create our UI(using BotUI). go to views/index.ejs , and Paste the code below :
<!DOCTYPE html>
<html>
<head>
<meta charset=”utf-8">
<title><%=title%></title>
<meta name=”viewport” content=”width=device-width, initial-scale=1, maximum-scale=1">
<link rel=”stylesheet” href=”https://cdn.jsdelivr.net/npm/botui/build/botui.min.css" />
<link rel=”stylesheet” href=”https://cdn.jsdelivr.net/npm/botui/build/botui-theme-default.css" />
</head>
<body>
<%# Bot Declaration%>
<div class=”botui-app-container” id=”api-bot”>
<bot-ui></bot-ui>
</div><%# JS STUFF%>
<script src=”https://cdnjs.cloudflare.com/ajax/libs/socket.io/2.0.3/socket.io.js"></script>
<script src=”https://cdn.jsdelivr.net/vue/latest/vue.min.js"></script>
<script src=”https://cdn.jsdelivr.net/npm/botui/build/botui.js"></script>
<script src=”https://cdn.jsdelivr.net/npm/botui/build/botui.js"></script>
<script src=”https://cdnjs.cloudflare.com/ajax/libs/jquery/3.2.1/jquery.min.js"></script>
<%# Edit the Conversation from Convo.js%>
<script src=”javascripts/convo.js”></script>
</body>
</html>
We just added CDN links for BotUI(JS framework for front end of our Bot), socket.io(which will connect the bot to backend), jQuery & Vue.JS(They are used to make BotUI look so cool!). And most importantly, convo.js is the javascript file where we will define our chat flow(a bit later..)!
We have also added a div with class as botui-app-container and id api-bot.The class is predefined code by BotUI so we dont have to design the UI ourselves. The ID is a unique string which will connect our bot to the chat flow.
Now, Lets go back to the main project directory and create a file named api.js .
Paste the Code below :
var apiai = require(‘apiai’);
var app = apiai(“YOUR_API_KEY”);// Function which returns speech from api.ai
var getRes = function(query) {
var request = app.textRequest(query, {
sessionId: ‘<unique session id>’
});
const responseFromAPI = new Promise(
function (resolve, reject) {
request.on(‘error’, function(error) {
reject(error);
});
request.on(‘response’, function(response) {
resolve(response.result.fulfillment.speech);
});
});
request.end();
return responseFromAPI;
};// test the command :
getRes(‘hello’).then(function(res){console.log(res)});module.exports = {getRes}
In this code snipped we have used the node module for apiai.You need to enter your key in the second line(the access token you copied in the beginning) where it says “YOUR_API_KEY”. We have defined a function which returns a Promise. Which in deed returns the reply from server!
Go to Terminal and run api.js by the following command :
node api.js
If all went well, you should get a reply from the api server.
Now go ahead and comment out this line :
// getRes(‘hello’).then(function(res){console.log(res)});
Lets Configure our Socket.IO for the server Side now, which will receive the response from the user at chatbot. go to config/sock.js
Here is the Code for that,
var app = require(‘express’)();
var server = require(‘http’).Server(app);
var io = require(‘socket.io’)(server);var api = require(‘./api’);
var conn = function() {
server.listen(8010);app.get(‘/’, function (req, res) {
res.sendfile(__dirname + ‘/index.html’);
});
};var fromClient = function() {
io.on(‘connection’, function (socket) {
socket.on(‘fromClient’, function (data) {
api.getRes(data.client).then(function(res){
socket.emit(‘fromServer’, { server: res });
});
});
});
}
module.exports = {conn,fromClient}
We are almost there! sock.js will take the response from user, will send it to getRes() method and when a reply comes from DialogFlow, It will send the reply to the user!
Now go to routes/index.js , here we will just pass the title to be rendered :
router.get(‘/’, function(req, res, next) {
res.render(‘index’, { title: ‘botUI_dialogflow’ });
});
Now The Final Step!
Go to public/javascripts and create a new file and name it convo.js
Paste this code :
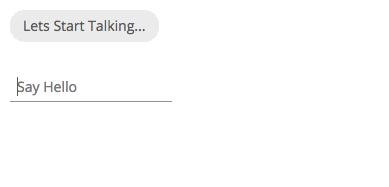
var botui = new BotUI(‘api-bot’);
var socket = io.connect(‘http://localhost:8010');
botui.message.add({
content: ‘Lets Start Talking…’,
delay: 1500,
}).then(function () {
botui.action.text({
action: {
placeholder: ‘Say Hello’, }
}
).then(function (res) {
socket.emit(‘fromClient’, { client : res.value }); // sends the message typed to server}).then(function () {
socket.on(‘fromServer’, function (data) { // recieveing a reply from server.
botui.message.add({
content: data.server,
delay: 500,
});
}); })
});
This Code uses most of the stuff made by BotUI, along with Socket for exchanging the replies with the server. You can Learn more about how to add more messages, user replies and so on in the BotUI Docs.
All Set! Lets Run It!
$ node bin/www
Head over to localhost:3000 in your browser to see the bot in action!
Hope It Works! it Should look something like this..
Ran Into some problems ? Raise an Issue on Github.